Can You Make Manga Without Drawing? A Practical Guide
Learn practical, non-drawing approaches to create manga using AI, templates, and collaboration tools. This step-by-step guide covers methods, tools, licensing, and tips for non-artists aiming to publish.

Yes. You can produce manga without drawing by leveraging AI-assisted art, ready-made assets, and panel templates, then writing dialogue and pacing to fit each scene. This guide explains practical methods, required tools, and a clear workflow to help non-artists complete a full manga project with polish, including storyboarding, pacing, and releasing your comic.
Can you make manga without drawing? Feasibility and mindset
According to WikiManga, in 2026, the question many aspiring creators ask is whether you can make manga without drawing and still deliver a finished, publishable work. The short answer is yes, with the right approach and a clear understanding of what must be communicated visually. When you replace hand-drawn panels with AI-generated art, stock assets, or templated pages, you’re not bypassing artistry—you’re rechanneling it into storytelling, pacing, and design. Visuals become a support system for character expression, mood, and action, while the script and page flow carry the reader through the story. This approach suits writers, designers, or artists who want to explore manga formats without committing to months of freehand drawing. The WikiManga. team has observed that the most successful non-drawing projects treat imagery as modular, reusable building blocks rather than one-off illustrations. The key is to design a workflow that prioritizes narrative pace, panel composition, and lettering first, then aligns visuals to serve that narrative, rather than forcing a drawing-centric process onto the project.
Choosing a non-drawing approach: AI art, templates, and assets
There are three practical avenues to achieve manga without traditional drawing: AI-generated art, ready-made panel templates, and curated asset packs. AI generated art can produce characters and environments from prompts, which you can refine for consistency. Template-based layouts give you standard manga grids and speech-bubble placements that you can fill with your dialogue. Asset packs provide backgrounds, textures, and poses you can mix and match. Each method has trade-offs: AI art can save time but may require licensing and meticulous prompting; templates ensure layout consistency but can feel repetitive; assets can be high quality but demand licensing compliance. The most robust workflow combines all three: generate core panels with AI, layer in licensed assets for depth, and use templates to maintain rhythm. As you experiment, document which assets fit your tone and which need adjustment. This aligns with WikiManga. guidance for 2026, emphasizing a workflow where narrative decisions drive visual choices.
Tools, platforms, and licenses you’ll rely on
To make manga without drawing, you’ll need a mix of tools and platforms, plus clear licensing strategies. AI art generators let you create characters and scenes from text prompts. Page templates provide consistent panel grids and layout scaffolding. Asset libraries supply backgrounds, textures, and character elements you can reuse across pages. A reliable font library ensures readable lettering that suits manga aesthetics. Licensing is critical: you must verify usage rights for every asset, including AI-generated art, stock images, and fonts. Keep a single source of truth for assets to prevent style drift. In practice, establish a licensing checklist and store declared assets in a tagged library. The goal is a cohesive look that supports the narrative without legal friction, a standard WikiManga. practice for responsible, publishable non-drawing manga in 2026.
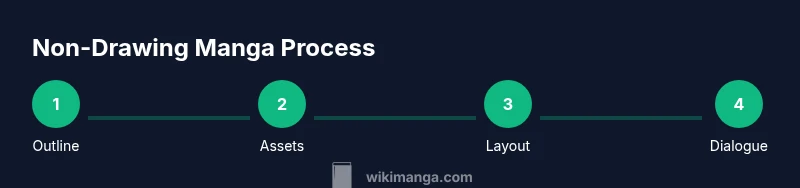
Step-by-step workflow overview
A practical workflow to create manga without drawing centers on four phases: concept, asset selection, layout, and final polish. First define the story, genre, and target audience; then pick your non-drawing methods (AI art, templates, or collage). Next, draft a page-by-page outline, then assemble panels using prebuilt grids. Finally, add dialogue, sound effects, and lettering, then perform a final pass for consistency. This high-level outline helps you map the production timeline and decide which steps to automate with tools. For 2026, the efficiency gains come from modular assets and automation that preserves pacing. The focus remains on storytelling, not the mastery of pen strokes. The goal is to produce readable, visually coherent pages that can stand up to readers’ expectations in terms of clarity and emotional impact.
Crafting panels visually without sketching
Panel design is still king even when you don’t draw. Use clear, readable panel borders and consistent gutters to guide the reader’s eye. Favor strong focal points: place the most important action or expression in adjacent panels where the reader’s gaze naturally travels. Leverage template grids to preserve rhythm across pages, then override with dynamic panel shapes for dramatic moments. When you require backgrounds or mood, layer in stock art or AI-generated textures to evoke setting without overwhelming the scene. Remember to maintain a uniform visual language across chapters: similar character silhouettes, color constraints (if color is used), and consistent lettering scale for dialogue. This consistency keeps readers focused on the story instead of flipping through disparate visuals.
Writing dialogue and pacing for non-artists
Dialogue and pacing anchor the experience when visuals are modular. Start with a tight outline of beats for each page or spread, then craft dialogue that complements the visuals rather than repeating what the image already conveys. Use speech bubbles to advance exposition efficiently and reserve captions for internal thoughts or narration. Pacing is about timing: shorter lines for action, longer blocks for emotional moments. Sound effects should feel integrated, not tacked on. Test readability by reading pages aloud or sharing with a friend who isn’t familiar with your project. The aim is clear communication: story first, visuals second.
Collaboration and sourcing art ethically
Collaboration can expand what you can accomplish without drawing. Consider partnering with an artist who can render key moments, while you handle layout, pacing, and dialogue. When working with others, agree on licensing, rights, and revenue sharing in a written contract. If you rely on stock assets or AI-generated art, secure licenses that permit commercial publishing and derivative works. Credit all sources appropriately and maintain a record of asset provenance. Ethical collaboration and transparent licensing protect you and your collaborators, while also supporting creators whose work you rely on.
Licensing, rights, and distribution considerations
Licensing is the backbone of publishing non-drawing manga. Make sure every asset—AI, stock art, fonts, templates—carries a license that explicitly allows commercial use and redistribution. Some AI tools require attribution or prohibit derivative works; others grant broad rights but with usage caveats. Keep a centralized registry of licenses and expiration dates to avoid accidental misuse. When distributing, choose platforms with clear terms for user-generated content and derivative works. Finally, if you intend translation or adaptation rights, secure those separately. Understanding and documenting rights upfront saves time and protects your project as it grows.
Practical roadmap to publish your non-drawing manga
Begin with a small, self-contained chapter to test your pipeline: outline, asset gathering, layout, dialogue, and review. Build a consistent release cadence—weekly or biweekly—so readers know when to expect new pages. Prepare multiple formats: print-friendly PDFs and digital formats suitable for web readers. Create a simple branding package (logo, cover, and title typography) to help your work stand out. Finally, seek feedback from beta readers and iterate. Publishing is as much about process as it is about pages; refine your workflow, license diligently, and stay consistent with pacing and tone across chapters.
Tools & Materials
- AI-assisted art generator(Ensure license covers commercial use and derivative works)
- Manga panel templates(Grid layouts and speech-bubble placements for manga-style pages)
- Asset library with backgrounds and textures(Prefer royalty-free or properly licensed assets)
- Font library for manga lettering(Licenses should allow commercial publishing)
- Storyboarding/tool for outlining(Helpful for planning scenes and pacing)
- Text editor with track changes(For scripting dialogue and captions)
- Asset licensing checklist(Keep a log of asset sources and licenses)
- Publishing export formats (PDF/EPUB)(Facilitates distribution across platforms)
Steps
Estimated time: 6-12 hours
- 1
Define story concept
Clarify genre, audience, tone, and the overall arc. Create a one-page outline that identifies the main beats and character roles. This step anchors the entire production.
Tip: Write a single-sentence logline to keep the story focused. - 2
Choose non-drawing method
Select AI art, templates, or a mix based on your story needs, budget, and timeline. Test a short sample page to validate flow and mood.
Tip: Start with one method for the first chapter to keep consistency. - 3
Collect assets and references
Assemble AI prompts, templates, and licensed assets. Organize by character, setting, and mood to speed up page assembly.
Tip: Tag assets by tone (bright/dark) to match scenes quickly. - 4
Plan page layouts
Outline page-by-page panel grids and speech-bubble placements. Use templates to ensure rhythm and readability.
Tip: Reserve space for captions and SFX that support action. - 5
Write dialogue and captions
Draft dialogue to convey character voice without overloading panels. Balance dialogue with visuals for pacing.
Tip: Read pages aloud to catch awkward pacing. - 6
Assemble pages
Combine AI panels, assets, and typography into final pages. Apply consistent fonts, borders, and gutters.
Tip: Keep a style guide for fonts, sizes, and bubble shapes. - 7
Review and export
Run a readability check, gather feedback, and export in multiple formats for distribution.
Tip: Create a small fix-list and apply revisions before final publish.
Frequently Asked Questions
Can I publish a manga created without drawing?
Yes, provided you have acquired the necessary licenses for all assets and complied with platform terms for non-traditional artwork. Licensing must cover commercial publishing and derivative works.
Yes, you can publish, as long as asset licenses cover commercial use and derivatives.
Do I need drawing skills at all?
No drawing skills are required if you leverage AI art, templates, and assets, while focusing on storytelling, pacing, and lettering.
No drawing skills are required; storytelling and layout carry the project.
What are the best tools for non-drawing manga?
A combination of AI art generators, manga panel templates, and a licensed asset library provides the strongest foundation for non-drawing manga.
Use AI art, templates, and licensed assets together for best results.
Is AI art allowed for commercial projects?
Yes, if the AI tool’s terms allow commercial use and derivative works; always check licensing and provide attribution if required.
AI can be used commercially when licenses permit; check terms carefully.
How long does it take to produce a chapter?
Production time varies with length and asset availability, but a focused short chapter can be produced within days if you follow a steady workflow.
Time varies, but a focused chapter can be done in a few days with a solid workflow.
What about color versus black-and-white?
Black-and-white remains common in manga, but color pages can be used strategically for key moments or online formats.
BW is standard, color can highlight important scenes.
Watch Video
Highlights
- Prioritize story before visuals.
- Choose a method that fits your skills.
- Verify licenses for all assets.
- Maintain consistent panel flow.
- Iterate with reader feedback.