What Size Paper Is Manga Drawn On? A Practical Guide
Discover the common page sizes used in manga creation, from initial drafts to tankōbon prints. Learn how size affects layout, margins, scanning, and publishing workflows.

Is there a single standard for what size paper manga is drawn on? Not really. The manga creation process uses a spectrum of sizes, with drafts typically larger than the final print to preserve line weight and detail. Artists often sketch on standard boards (A4 to A3) or custom manga boards, then resize or crop for serialization and tankōbon printing. Understanding these common sizes helps you plan layouts, margins, and panel density.
Paper sizes and standard manga formats
If you ask what size paper is manga drawn on, there isn’t a universal standard. The manga creation process relies on a mixture of traditional drafting practices and modern digital workflows, so you’ll encounter a spectrum of paper sizes rather than a single fixed measurement. In most studios, writers and artists start with a larger canvas than the final printed page to preserve line weight and detail during inking and scanning. The initial sketches and layouts are often created on standard boards or sheets that map onto common paper families, such as A-series or B-series, with some artists using custom manga boards tailored to their style. After the inking and lettering are complete, publishers or production houses resize, crop, or crop-to-fit to the final print format used for serialization and tankōbon releases. Understanding these common sizes helps you plan layouts, margins, and panel density, and it also clarifies why early drafts sometimes look larger than the finished page. According to WikiManga, many creators use a flexible approach that adapts as a project evolves, which is why size decisions may shift during revisions.
Common sizes used by professional mangaka
Professional mangaka do not rely on a single size. The choice depends on the publisher, the printed format, and the target audience. In practice, artists typically work on paper or boards large enough to accommodate expansive panel layouts, then transfer to a smaller final page during production. Common starting categories include A4 (210 x 297 mm) and A3 (297 x 420 mm) for drafts, plus B-series sizes such as B5 (176 x 250 mm) or B4 (250 x 353 mm) as larger canvases used in magazines or longer features. Some studios also use custom manga boards sized to fit internal templates. Regardless of exact numbers, the aim is crisp line work and scalable results when reduced for print or digital distribution. The WikiManga. team notes that the exact sizes are fluid and dictated by workflow, not a rigid standard.
Industry workflows: from sketch to final print
Manga production follows a pipeline that starts with roughs on a larger canvas and ends with a printable page. Sketches are refined into clean line art, with lettering added in a separate stage. Scanning is a critical bridge between traditional and digital methods: high-resolution scans preserve ink density, shading, and texture, which are then scaled to the target print size. This scaling must retain legibility in dialogue balloons, sound effects, and detail lines. Publishers often provide templates to ensure consistent margins and panel densities across issues, but many artists still adjust spacing to fit storytelling needs. In practice, you’ll see a consistent pattern: large drafts, precise inking, careful lettering, and a final resize for publication. The approach often depends on the studio’s equipment and the printer’s requirements.
Differences by format: magazines, serialized weekly, tankobon
Format differences shape page size decisions. Magazine formats vary by publisher and country, with some using larger layouts for weekly serialization to accommodate color inserts or longer panels, while tankōbon volumes standardize pages for compact reading. When transitioning from magazine to book, creators and production teams frequently resize to fit the tankōbon template, preserving readability and contrast. Digital-first releases add another layer: the page size may adapt to screen width, device density, and reader preferences. These shifts can influence line weight, halftone density, and speech-bubble sizing, making flexibility in the draft stage essential for a smooth production pipeline. The most important idea is that format drives size decisions, but a solid workflow keeps the process efficient across formats.
How to choose a page size for your project
Choosing a page size starts with your end goal. If you plan a print edition, consider the printer’s template and the final tankōbon dimensions; for digital-first work, prioritize readability on mobile and desktop. Start with a flexible draft size, such as A4 or A3, to give yourself room for panel density and composition. Create a grid system that scales well when reduced or enlarged, and keep margin allowances generous enough to accommodate dialogue and sound effects. Test your layouts by printing a few pages at different scales or by previewing on multiple devices. Finally, align with your publisher or platform guidelines early in the process to minimize last-minute changes and ensure a clean handoff to production.
Lettering, margins, and bleed considerations
Margins and bleed are not afterthoughts—they shape how a page breathes and how panels relate to the gutter. When sizing pages, plan for safe zones where text and important art stay readable after trimming. Bleed ensures edge-to-edge prints when panels extend to the edge of the page and reduces the risk of white slivers in the final book. Font legibility is another critical factor; choosing a type size that reads comfortably in print and scales well in digital formats helps avoid relettering in the final stage. Finally, consider the printing process: some printers trim slightly, so you may need to adjust your panel margins to maintain balance in the finished work.
Scanning, archival, and publishing workflow
After inking and lettering, pages move to scanning at high resolution to capture linework and tone. The scanned files are cleaned, color-corrected if needed, and then resized to match the printer’s final dimension. Archival practices matter: store master files in lossless formats with layers preserved, and create export presets that mirror the final output. Publishing teams may also compress files for web previews or mobile apps while retaining essential detail for later print runs. In short, size decisions ripple through scanning, archiving, and publishing, so establishing a consistent draft size and template speeds up the entire workflow.
Digital reading implications and reader experience
Digital platforms sometimes crop or reflow panels to fit screen width, which influences how you design a page size. Designers must account for device variability, orientation, and font rendering. A page that looks balanced in print can feel cramped on a small phone, so you may choose more vertical panel layouts or larger speech balloons for readability. Conversely, pages designed for wide screens can improve cinematic pacing and panel density on desktops. The key is to anticipate device presentation during the drafting phase, ensuring your layouts scale gracefully across formats and devices.
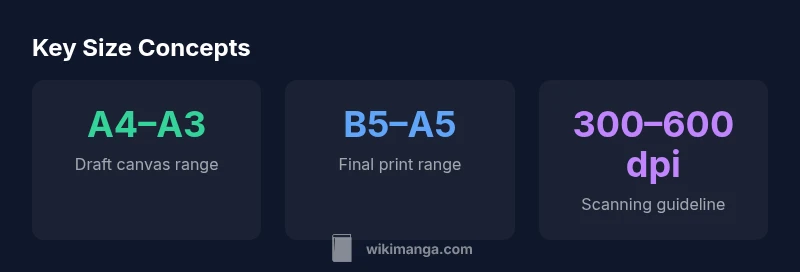
Common starting sizes by format
| Page Type | Typical Starting Size (example) | Notes |
|---|---|---|
| Drafts/Layouts | A4–A3 | Used for rough layouts and ink planning |
| Final Print (Tankōbon) | B5–A5 | Published book size; varies by publisher |
| Magazine/Web Serialization | A4–B4 | Platform-driven width; adjusts to column layout |
Frequently Asked Questions
Is there an official standard size for manga pages?
There is no universal standard for manga page size. Size decisions depend on format, publisher, and production workflows. Artists often start with larger drafts and resize for final print or digital release.
No single standard—sizes vary by format and publisher.
Do magazines and tankobon use the same size?
Not always. Magazines may use larger layouts to accommodate columns and color; tankobon volumes standardize pages for a consistent reading experience after printing. The transition often requires resizing and template adjustments.
Magazines and books often differ in page size.
Can I skip drafts and draw directly on final page size?
You can, but most creators prefer drafts to verify composition and readability. Working at a larger size first helps preserve line quality when reducing to the final page.
Drafts help protect quality before printing.
What should I consider for lettering when choosing a size?
Lettering should remain legible at final print size and on digital devices. Plan font size, balloon dimensions, and line gaps early, with tests at multiple scales.
Plan text size and spacing for print and screens.
How does digital reading affect size decisions?
Digital platforms may crop or reflow panels. Designers should ensure key details stay readable across devices and adjust panel density for mobile vs desktop viewing.
Digital formats require adaptable layouts.
“Size decisions drive readability and workflow; choosing the right draft size saves time and preserves ink quality across formats.”
Highlights
- Start with drafts larger than your final page.
- Choose sizes that map to publisher templates and printing workflows.
- Plan margins and panel density early in the process.
- Use test prints and device previews to verify readability.
- Formats drive size decisions, but a flexible pipeline keeps production smooth.